
Topics
Crisis Core Final Fantasy VII Reunion Trophy Guide & Roadmap

Author: Foggy
Final boss at FoggyProductions
Published: December 13, 2022
Death metal lover and a gamer. Plays guitar - occasionally. In real life a QA, assuring quality of products and automating stuff (need to find a way to automate video editing).
Welcome Zack fans! I'm one, and a big one! FF Reunion is out and it's a beautiful remake (it seems like a remake). On your journey towards the platinum trophy you will have to be careful about not missing anything, so let's start.
Step 1 - Collect everything that is along the way up until end of Chapter 7
You can play the game on Normal difficulty, beat the final boss (do not overwrite your save prior to the final boss), load the save before the final boss, grind, change to Hard, beat the final boss again. That will take care of the Hard difficulty trophy without having to replay the whole game again.
Like said, everything in this game is mostly missable. The game consists of story and optional missions - some optional missions gets locked after chapter 7 as you can't return to Shinra areas anymore. Make sure to follow my chapter guide topic, they cover everything chronologicaly, including the trophies along the way.
You don't need to do all of the side missions (you can play missions via save point) as soon as you unlock them, but do the ones I will note in topics. I will note when the point of no return comes in Chapter 7 and list out everything you must have at that point before proceeding.
There is a lot of miscelaneous trophies during story missions, so keep a separate save files at the start of each chapter and on different save points during chapters so you can easily replay some part if you miss something. If you miss out on anything, you will have to replay the whole game or from the save point from which you miss stuff - there are no carry-overs in the NG+.
Step 2 - Finish the game while collecting everything after Chapter 7
Simply continue from the point of no return and finish the game. If you feel brave, you can load your save before the final boss, change to Hard, and redo the fight to unlock the Hard difficulty trophy.
Still, it's better to just load the save before and work your way towards 100% DMW Progress. The DMW unlocks are luck-based, but it can be done easily on Mission 1-1-1 while having Faerie Ring equiped (bought from the Mythril Mine Trading Shop for 20,000 Gil) - you will heal more than the enemies hits you, so you can leave your game overnight to farm basically everything. DMW gets unlocked randomly, so it will take a few hours.
When you collect 100% DMW's, you will unlock Genji Armor, which will give you 99,999 HP and make your life easy for the rest of the missions.
Step 3 - Finish all 300 missions and defeat the Minerva Boss
What remains is to prepare by collecting all Genji Equipment, maybe all materias and do a build that will carry you through the fight. Minerva is part of side missions, and she is the toughest boss in the game. By doing all of this you should unlock the platinum trophy.
Topics (the next topics lists everything in chronological order including all trophies
Crisis Core Final Fantasy VII Reunion - Chapter 01 Collectibles
Crisis Core Final Fantasy VII Reunion - Chapter 02 Collectibles
Crisis Core Final Fantasy VII Reunion - Chapter 03 Collectibles
Crisis Core Final Fantasy VII Reunion - Chapter 04 Collectibles
Crisis Core Final Fantasy VII Reunion - Chapter 05 Collectibles
Crisis Core Final Fantasy VII Reunion - Chapter 06 Collectibles
Crisis Core Final Fantasy VII Reunion - Chapter 07 Collectibles
Crisis Core Final Fantasy VII Reunion - Chapter 08 Collectibles
Crisis Core Final Fantasy VII Reunion - Chapter 09 Collectibles
Crisis Core Final Fantasy VII Reunion - Chapter 10 Collectibles
Crisis Core Final Fantasy VII Reunion - All Flower Wagon parts
Crisis Core Final Fantasy VII Reunion - All Missions List and tips
Crisis Core Final Fantasy VII Reunion - DMW List and progression
Crisis Core Final Fantasy VII Reunion - Fan Club Locations and tips
Crisis Core Final Fantasy VII Reunion - Genji Equipment
Crisis Core Final Fantasy VII Reunion - How to raise Buster Sword proficiency fast
Crisis Core Final Fantasy VII Reunion - Materia Guide
Crisis Core Final Fantasy VII Reunion - Shops List and tips
All Crisis Core Final Fantasy VII Reunion Videos Playlist
Other FF7 Trophy Guides
Final Fantasy VII Remake Trophy Guide & Roadmap
Final Fantasy VII Remake Intergrade Yuffie DLC Trophy Guide & Roadmap
Automatic story-related trophy. It's simple as that, just beat your first opponent and you will unlock the trophy.
Limit breaks are related to DMW meter you see in the battles (upper left corner). When the same images align, you will get the opportunity to press the triangle button and perfom a limit break. It's impossible to miss triggering one.
In Chapter 3, after visiting the director's office you will learn about materia fusion. I don't think this trophy is even skippable, you will have to fuse something as a part of the tutorial when you unlock materia fusion. Basically, you can combine 2 materia to get either a stronger version of the same one, or something new. You need SP that you get in each battle. You will probably spend some time on making yourself OP when tackling all missions, and that is when you'll fuse a lot.
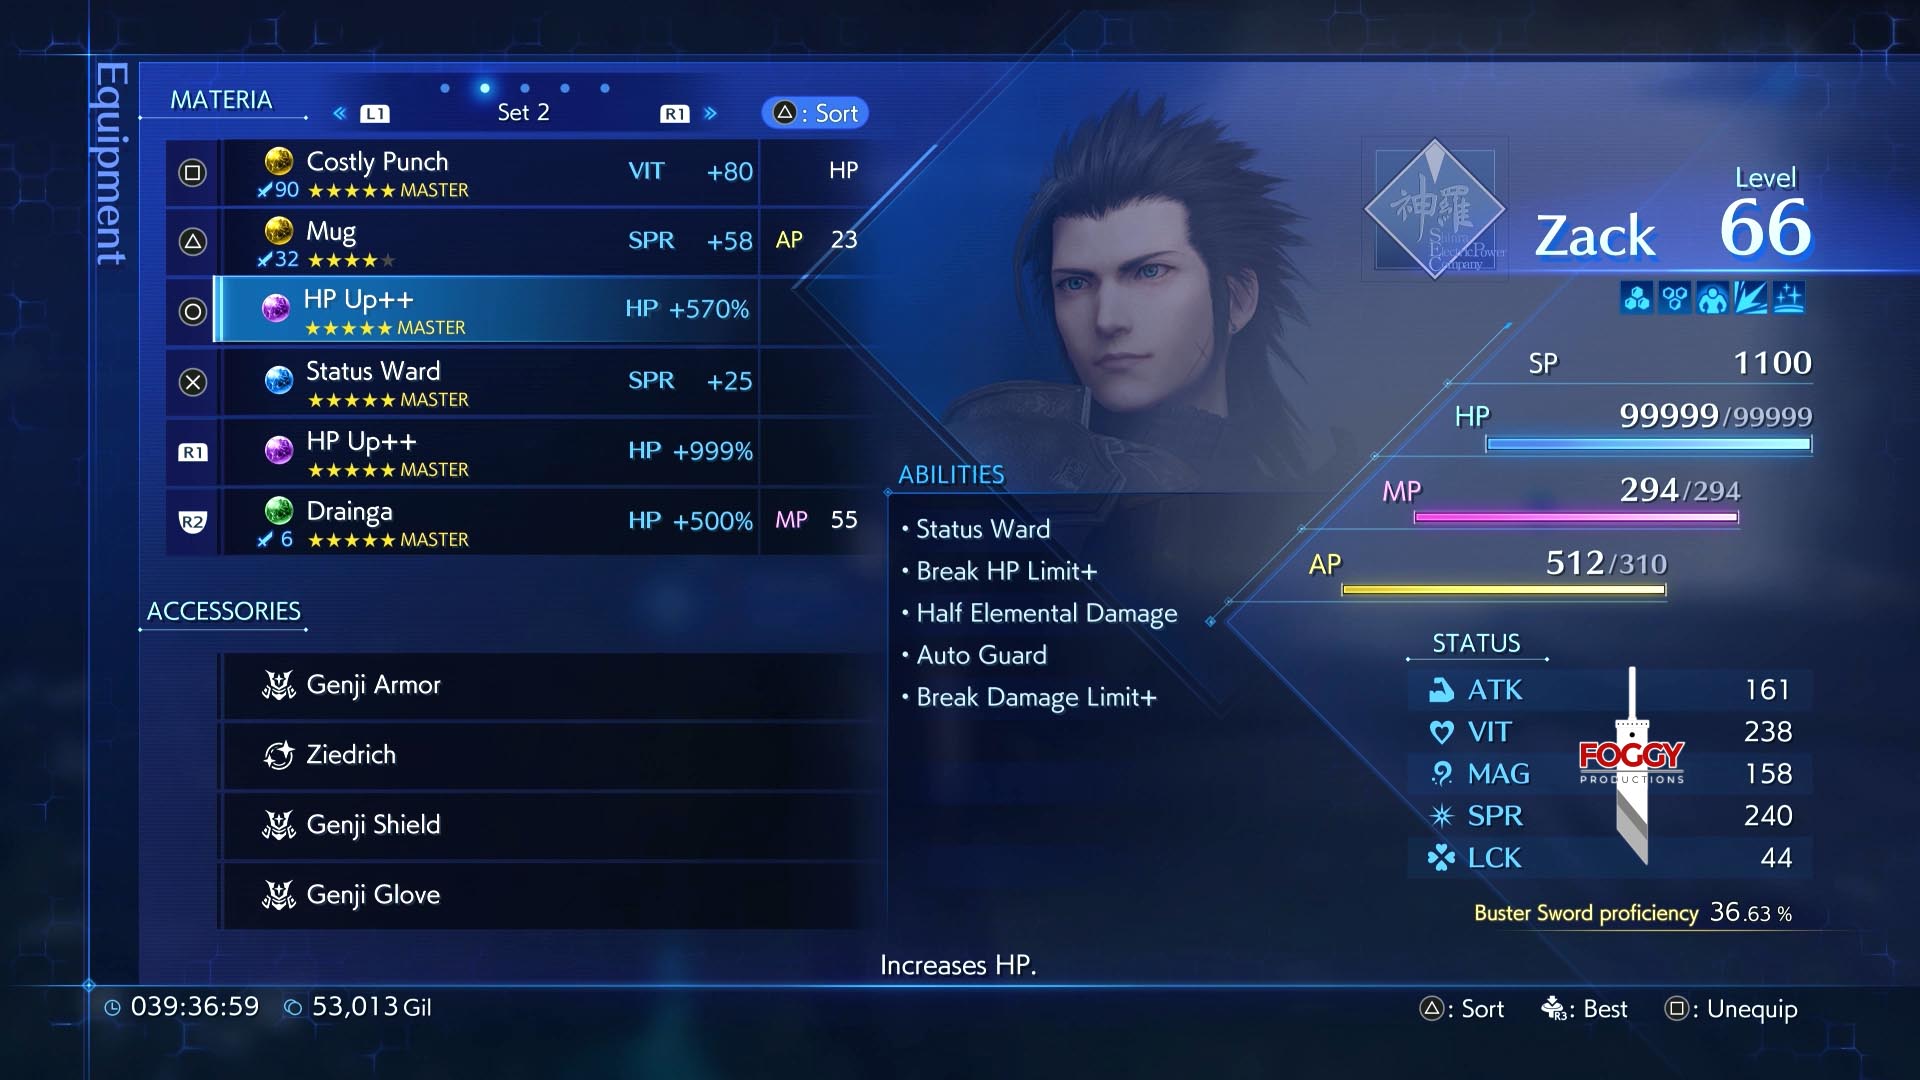
By default, the damage ceiling is 9999 damage. It's the same with your HP as well. There are 2 ways to break this limit:
- Increase Buster Sword Proficiency to 25% on the PS5 version. It's weird, but the % on the PS4 version is 12.5%. But on the PS5 version when you raise it above 15% it will jump to 25% at that point.
Crisis Core Final Fantasy VII Reunion - How to raise Buster Sword proficiency fast - "Brutal" accessory is another way to break the limit. It's a reward from Mission 7-4-6, 9-5-1, or found in a chest in Mission 9-6-3.
With either of these set, now you need to find some high-damage materia that will make this hit. You can use the Quake, or Darkness Materia (reward from Mission 4-4-2 and 8-4-6), but it requires high stats, so your best bet is Costly Punch materia (yellow materia). To get it, you need Goblin Punch (rewards for the Watefal trophy mini-game during Chapter 9, or found in a chest during mission 9-5-4) + any purple materia from Research Dept. QMC+ Shop (reward from the chest in Chapter 9 Gongaga Outskirts - after talking to Cissnei check before climbing up the hill).
When you have 9999 HP (you can equip some HP++ materias and max them out, plus some accessories that raise HP %), and you hit an enemy's weak spot (critical hit from behind), you should deal 99999 damage. Neat! You will use this for beating all missions probably, it's a great way to be really strong.
There is only 1 missable DMW Image (limit break) during the game. It's the Phoenix – Rebirth Flame, obtained in Chapter 8 in Nibelheim during Seven Wonders (it's the first wonder). When you find them all (summons are usually tied to some mission), you need to unlock all unique animations that ocassionaly ocurrs. The next topic can help you with the list, tactitcs and everything you'll need:
Crisis Core Final Fantasy VII Reunion - DMW List and progression
Progress under DMW menu is related to getting all unique animations that can occur randomly during fights for a certain DMW Image. The next topic can help you with the list, tacticts and everything you'll need:
Crisis Core Final Fantasy VII Reunion - DMW List and progression
Are you ready? There are 300 missions that you need to beat to unlock all mission-related trophies. Yes, it's a lot. Some missions are unlocked only by doing some side-stuff during the story missions, and the full list can be found:
Crisis Core Final Fantasy VII Reunion - Chapter 07 Collectibles
More details, a full list, and tactics for beating all of the missions can be found under this topic:
Crisis Core Final Fantasy VII Reunion - All Missions List and tips
Shops are unlocked by beating some of the missions, or even from the chests during the story. The one from the Gongaga chest can be missed, so be careful. The next topic will list them all, and the next topic will give more info for the missions.
Crisis Core Final Fantasy VII Reunion - Chapter 10 Collectibles
More details, a full list, and tactics for beating all of the missions can be found under this topic:
Crisis Core Final Fantasy VII Reunion - All Missions List and tips
You don't need all mails from each sender, but at least 1 from each. Let me list all missable mails here, and the rest can be found under the next topic at the bottom where you see the list, or by following my chapters topics:
Crisis Core Final Fantasy VII Reunion - Chapter 10 Collectibles
Missable mails:
- Red Leather – Join the Red Leather Fan Club by speaking to the Genesis Fan in Sector 8 – Fountain in Chapters 2, 3 or 7 before you leave Midgar for good.
- Keepers of Honor – Join the Keepers of Honor Fan Club by speaking to the Angeal Fan in Sector 8 – Fountain in Chapter 2, 3 or 7 before you leave Midgar for good.
- Study Group – Join the Study Group Fan Club by speaking to the Genesis Fan in Sector 8 – LOVELESS Avenue in Chapter 2, 3 or 7 before you leave Midgar for good.
- Reporter – Speak to the Reporter upstairs in Sector 8 – Fountain in Chapter 5 and don’t report him when asked. If you report him, you will not be able to get any Reporter mails! After the scenes the mail is yours.
- Silver Elite – Join the Silver Elite Fan Club by speaking to the Sephiroth Fan in Sector 6 – Park in Chapter 5. Answer 3 of her questions correctly with "Masamune", "Super Nova", and "Left-Handed".
- Shop News – Speak to the City Planning Executive in Shinra Building Entrance in Chapter 5 or 7 to unlock the required missions. The full list can be found under Chapter 10 collectibles topic.
- Zack Fan Club – Speak to Cissnei in Junon in Chapter 6 after the Junon Defense minigame (riding via the elevator before proceeding), then speak to the Shinra Receptionist in Shinra Entrance in Chapter 7 to join the Zack Fan Club.
- Wonder Hunter – Complete the 7 Wonders of Nibelheim in Chapter 8 and 9. It starts in Chapter 8 and the last wonder is during chapter 9
You need Genji Shield, Armor, Gloves and Helm. Details and a complete Genji equipment guide can be found here:
![]()
This happens during Chapter 1 when you embarge on the mission.
You need to kill all 16 enemy groups after entering Fort Tamblin. If you observe the upper-left corner, you will some some checkmarks and icons. There are 5 hidden encounters, which means you can only see 11 icons when you start, and the additional ones will show as you unlock them. First, proceed until you trigger a scene with a rotating wall. Then you can backtrack to the start, ispect the big tower for a fight, all moving walls along the way (3), and the last tower (2 towers in sum). The trophy unlocks when you reach the woods, after which Lazard will coment out on your actions and the trophy unlocks.
1:37 - Hero of the Wutai War trophy start
4:50 - Hero of the Wutai War trophy triggering Rotating Doors #1 (this unlocks towers and other doors)
5:20 - Hidden Encounter - Rotating Doors #1
6:45 - Hidden Encounter - Tower #1
10:00 - Hidden Encounter - Tower #2
11:40 - Hidden Encounter - Rotating Doors #2
13:00 - Hidden Encounter - Rotating Doors #3
14:30 - Hero of the Wutai War trophy unlock (it gets unlocked in the woods a bit later)
There are 5 Fan Clubs that you can join:
- Red Leather
- Keepers of Honor
- LOVELESS Study Group
- The Silver Elite
- Zack Fan Club
If you follow my chapter topic, you will unlock all related trophies.
How to get them all, not miss any of these, and how to unite them is explained/grouped also in the next topic:
Crisis Core Final Fantasy VII Reunion - Fan Club Locations and tips
Do not proceed further in Chapter 2 (don't talk to Tseng yet to start the mission). Instead, leave through the Briefing Room and go outside to reach the Fountain area. Immediately go back the way you came to enter the Shinra Building again. Now, find the elevator doors, and go to "SOLDIER Floor". Talk to the NPC there, but don't go to the Briefing Room as you're told to. Find the "MATERIA ROOM" left of a save point. Talk to the Researcher inside on the left to unlock Mission 8-2-1, then complete through 8-2-6 to get 6 Mako Stones. It's not really hard, but last one could be. Make sure to have Fire and Cure materia to make it easier, and heal with Ether if you run out of MP. When you're done, give the 6 Mako Stones to the Researcher, watch the scenes, and you will unlock the trophy.
1:22 - Master Mako Stone Miner trophy start (Missions unlock - Before Briefing room scenes!)
2:40 - Mission 8-2-1 (SPR Mako Stone)
4:18 - Mission 8-2-2 (VIT Mako Stone)
5:45 - Mission 8-2-3 (MAG Mako Stone)
7:23 - Mission 8-2-4 (HP Mako Stone)
13:25 - Mission 8-2-5 (ATK Mako Stone)
16:35 - Mission 8-2-6 (LCK Mako Stone), have Cure and Fire materias on yourself
21:00 - Master Mako Stone Miner trophy unlock (Give all 6 Mako stones to the NPC)
![]()
This trophy can be unlocked during Chapter 2, when you end up in the mission in Banora village.
Banora Treasures trophy - Part 1
In Banora village, there are 5 golden item points you can interact with. You MUST interact with all 5 before talking to Tseng at the top of the hill that comes after talking to Angeal's mother, otherwise you will not be able to pick the items you didn't interact with. 3 are in the village where you meet Angeal’s mother very close to each other, and two leading up the cliffside to Tseng - one at the bottom, another at the top. Interact with them all before entering the factory, then after leaving the factory and after the missile mini-game you will have to run back to the village. You need to collect all 5 items before the timer runs out, but this part comes after missile mini-game.
Slicin’ SOLDIER trophy - This comes in between, then you're back to the last par of Banora Treasures trophy.
Banora Treasures trophy - Part 2
After the missile mini-game proceed further and you will trigger another scene. The timer will start. Run fast and collect all 5 yellow items before you enter the house to unlock the trophy.
50:40 - Banora Treasures trophy - Part 1 (First 3 items - Inspect them before you enter the facility, you must if you want the trophy)
51:58 - Slicin’ SOLDIER trophy (Press the attack button when blue target appears - just when the rocket is about to hit you. Do it 10 times)
52:52 - Banora Treasures trophy - Part 2 (Collect all 5 items that you've inspected before, before you enter the house)
![]()
This can be unlocked in Chapter 3.
When the assault on Shinra Building begins (which happens after heading to the Director’s Office) you will have to enter the elevator. First choose "Head to the entrance right away". and during the ride choose "Get off and look around". Save the 3 people on the SOLDIER floor (1 will be fought when you exit the elevator, 1 more NPC is in the hallway area, and 1 in Training Room). When you get outside in Sector 8, save the two people in LOVELESS Avenue.
33:45 - Everyone’s Hero trophy start
34:28 - Everyone’s Hero Encounter #1 (Soldier floor)
35:00 - Everyone’s Hero Encounter #2 (Soldier floor)
36:06 - Everyone’s Hero Encounter #3 (Soldier floor)
38:05 - Everyone’s Hero Encounter #4-5 & DMW Image: Cissnei (Lucky Stars)
This can be unlocked in Chapter 3 at the beginning of the chapter.
Enter the Training Room and talk to Hojo to initiate virtual fights. Do this at the beginning of Chapter 3. Complete all challenges.
0:25 - First-Rate SOLDIER trophy (All challenges)
This trophy can be unlocked in Chapter 4.
After leaving the Slums you will reach the Fusion Chamber room with Hojo inside. After some scenes, do not talk to him to proceed, instead, interact with the machine on his left. It will count down from 5 seconds, stopping at 3 seconds. The device is broken, so you must continue the count in your head and press X at the moment when the counter shoul've been at 0 seconds. It's not that hard.
1:40 - Good Match for Aerith trophy start (Raise affection with Aerith to the max - inspect stores, do mini-games etc.)
2:20 - Good Match for Aerith - Store #1 (+10 points)
3:38 - Good Match for Aerith - Store #2 (+10 points)
5:05 - Good Match for Aerith - Store #3 (+10 points)
6:22 - Good Match for Aerith - Wait 10 times for a girl (+10 points)
8:23 - Good Match for Aerith - Give 5 points to a boy (+10 points)
11:05 - Good Match for Aerith - Answer with buying the medicine (+10 points)
12:20 - Master Blender trophy (+15 affection points) - Repeat 3 times
14:47 - Godlike trophy
15:50 - Bingo! trophy
17:30 - Good Match for Aerith unlock
18:11 - Precise Restoration trophy
18:54 - Of Significant Worth trophy
20:50 - Cell Raider trophy
![]()
This trophy can be unlocked in Chapter 4.
After leaving the Slums you will reach the Fusion Chamber room with Hojo inside. In the same room with Hojo, follow the bridge in the middle and interact with the fusion chamber. Answer the questions with "A SOLDIER operative like Sephiroth", "State-of-the-art science and technology", and "A person unafraid to challenge Shinra". This is it.
1:40 - Good Match for Aerith trophy start (Raise affection with Aerith to the max - inspect stores, do mini-games etc.)
2:20 - Good Match for Aerith - Store #1 (+10 points)
3:38 - Good Match for Aerith - Store #2 (+10 points)
5:05 - Good Match for Aerith - Store #3 (+10 points)
6:22 - Good Match for Aerith - Wait 10 times for a girl (+10 points)
8:23 - Good Match for Aerith - Give 5 points to a boy (+10 points)
11:05 - Good Match for Aerith - Answer with buying the medicine (+10 points)
12:20 - Master Blender trophy (+15 affection points) - Repeat 3 times
14:47 - Godlike trophy
15:50 - Bingo! trophy
17:30 - Good Match for Aerith unlock
18:11 - Precise Restoration trophy
18:54 - Of Significant Worth trophy
20:50 - Cell Raider trophy
This trophy can be unlocked in Chapter 4.
After leaving the Slums you will reach the Fusion Chamber room with Hojo inside. In the same room with Hojo (after some scenes with him when you enter), press the switch right from him while having Steal materia equipped (It's found during this mission from Bruno in Chapter 4 when leaving the Slums, which is just before you reach the Fusion Chamber with Hojo). You will need to use Steal Materia to steal from 6 Experiment enemies and get their keys. Search the hallway first, then enter the room with 6 small rooms, defeat/steal from remaining enemies and open all 6 doors, plus loot the 3 chests in each of these cells. Return back. You must do it under the timer, which is really easy, I was left with 1 minute.
1:40 - Good Match for Aerith trophy start (Raise affection with Aerith to the max - inspect stores, do mini-games etc.)
2:20 - Good Match for Aerith - Store #1 (+10 points)
3:38 - Good Match for Aerith - Store #2 (+10 points)
5:05 - Good Match for Aerith - Store #3 (+10 points)
6:22 - Good Match for Aerith - Wait 10 times for a girl (+10 points)
8:23 - Good Match for Aerith - Give 5 points to a boy (+10 points)
11:05 - Good Match for Aerith - Answer with buying the medicine (+10 points)
12:20 - Master Blender trophy (+15 affection points) - Repeat 3 times
14:47 - Godlike trophy
15:50 - Bingo! trophy
17:30 - Good Match for Aerith unlock
18:11 - Precise Restoration trophy
18:54 - Of Significant Worth trophy
20:50 - Cell Raider trophy
This can be done in Chapter 5 before proceeding with the story.
Speak to the SOLDIER 2nd Class in Sector 8 – LOVELESS Avenue and agree to help him (marked yellow on the map). You must find the Wutai Spies, to be exact, 6 of them. When you find the person who you think it's a spy, talk to that person 3 times to reveal their true identity. The are unlocked in chronological order, meaning that you must find the first one first, then the second on can be tackled etc.
- Spy #1 – Man walking the nortwestern street outside LOVELESS Avenue Theater.
- Spy #2 – Shinra Trooper walking in Sector 5 Market area. You can reach this area if you start from Sector 8 Fountain and go upstairs next to the fountain, then just to the east to enter the train station, then continue into the next area.
- Spy #3 – Male Shinra Employee coming out of elevator in Shinra Building Entrance, on the second floor. Go on that floor, near the elevator, then try to leave downstairs and you will hear an elevator sound. Return back and talk to the employee.
- Spy #4 – Climb the stairs near the fountain in the Sector 8 Fountain area, and talk to a woman talking to a man just near the entrance to the train station.
- Spy #5 – Talk to Shinra Employee in front of the rocket model inside the Shinra Building Exhibit Room. That room can be accessed when you enter Shira HQ from the Sector 8 Fountain area, and just enter one of the side doors on the base floor.
- Spy #6 – Talk to the only Kid with a hat in Sector 6 Slums Park. Park is on the right when you exit the Market area there.
13:22 - Wutai’s Nemesis trophy start (lower Wagon Part: Walnut Wood) & Spy #1
14:25 - Wutai’s Nemesis trophy Spy #2
17:17 - Flower Wagon Part: Mythril Tools Unlocks, Mission 2-1-4 Unlock
17:55 - Flower Wagon Part: Mythril Tools Unlocks, Mission 2-1-3 Unlock
18:15 - Wutai’s Nemesis trophy Spy #3
19:28 - Wutai’s Nemesis trophy Spy #4
20:33 - Wutai’s Nemesis trophy Spy #5
22:05 - Flower Wagon Part: Mythril Tools Unlocks, Mission 2-1-6 Unlock
23:11 - Wutai’s Nemesis trophy Spy #6, Wutai’s Nemesis trophy & Flower Wagon Part: Walnut Wood
There are 5 Fan Clubs that you can join:
- Red Leather
- Keepers of Honor
- LOVELESS Study Group
- The Silver Elite
- Zack Fan Club
If you follow my chapter topic, you will unlock all related trophies.
How to get them all, not miss any of these, and how to unite them is explained/grouped also in the next topic:
Crisis Core Final Fantasy VII Reunion - Fan Club Locations and tips
There are 3 flower wagons to be made. This happens during Chapter 7, before you go on a mission. You start with collecting the part for the first wagon, it's story-driven, and the rest you have to collect (if you've been following my chapter topics, you should have everything by now).
After building the first wagon as part of the story, there will be some scenes where Zack has to return back. You will be given some options during conversations, make sure to select "Wait, I need a little more time!" or anything related to going back to Aerith. Make your way back to her, and give her the other materials for the second cart. After some scenes give her more materials to build a third one, which will unlock the trophy. If you've been following my chapters topic, you should have all flower wagon parts up until this point. If you don't have, backtrack and try to gather what you're missing.
Crisis Core Final Fantasy VII Reunion - All Flower Wagon parts
10:44 - Midgar Full of Flowers trophy
10:57 - Say I want to be with away from Aerith and return to her again
11:40 - Midgar Full of Flowers trophy Wagon #1
12:27 - Midgar Full of Flowers trophy Wagon #2
13:30 - Midgar Full of Flowers trophy Wagon #3
This trophy will start in Chapter 8, and you will finish it in Chapter 9. You need to find 7 wonders in Nibelheim (in order).
0:00 - Seven Wonders Expert trophy, Seven Wonders #1 & DMW Image: Phoenix (Rebirth Flame)
0:58 - Seven Wonders #1 & DMW Image: Phoenix (Rebirth Flame)
2:00 - Seven Wonders #2 & 2000 Gil
3:33 - Seven Wonders #3 & Gold Shard
5:40 - Seven Wonders #3 Bombs location
8:00 - Seven Wonders #4 & Vital Slash (Mastered with ATK +15)
8:10 - Seven Wonders #4, Code Digit 1
8:55 - Seven Wonders #4, Code Digit 2
9:40 - Seven Wonders #4, Code Digit 3
10:30 - Seven Wonders #4, Code Digit 4
11:00 - Seven Wonders #4 Code solution (random every time, you need to count terms in your 4 rooms)
13:50 - Seven Wonders #5
15:30 - Seven Wonders #6 & ATK Up++ ( Up, Right, Up, Right, Up (after this you will start ascending the stairs), Left, Up, Left, Down, Right, Down. Inspect with X, and return)
Seven Wonders Expert trophy
When you arrive in Nibelheim you can start this quest by talking to a boy next to the waterwheel outside (near the house). You will have to find 7 wonders hidden in Nibelheim in order; 6 during this chapter, and 1 during the next one. This guide will name them all in order. Make sure not to talk to Sephiroth upstairs in the Inn in order not to advance the story - you can do couple of wonders before that moment.
Seven Wonders #1 & DMW Image: Phoenix (Rebirth Flame)
When you arrive in Nibelheim where you’re supposed to talk to Sephiroth, talk to the boy on the right side to start looking for the Wonders, then interact with the water tower just next to you. Report back to the boy to get hints for the second wonder. If you by any chance triggered a scene where Sephiroth enters Inn, don't worry.
Seven Wonders #2 & 2000 Gil
After the boy gives you another hint, go upstairs in the Inn (don't talk to Sephiroth to advance the story), and look at the painting of the chair. The chair will be with or without a person on it. If you go downstairs and back up, it will change. Inspect both times, then keep going down/up the stairs until you see a person going up. Follow him to confront him at the painting. Report back to the boy to get hints for the next wonder.
Seven Wonders #3 & Gold Shard
Head north to Nibelheim Outskirts, then to Mt. Nibel Trail (up the stairs from the village square, then east). Follow the path and go left when you see 3 kids and a branching path. At the end of this path you will encounter 3 Bomb enemies. Kill them all before they explode to get the "Gold Shard" as a reward. Blizzara is good against them. If some of the Bombs explode, just run back a bit and here again to fight again. Report back to the boy to get hints for your next wonder.
Seven Wonders #4 & Vital Slash (Mastered with ATK +15)
Head northwest to Nibelheim Outskirts, and then west into Shinra Manor. Your next wonder hint is to find the code for the safe. This is random every time, so you have to note that all 4 digits based on some puzzles in the 4 rooms.
The first digit can be solved by going to the room in the northeast upstairs. Peer through the keyhole. Count all the books not placed on the shelves to unravel the first digit. Count the ones on the floor, on the chair and the ones on the top of the bookcase. Add them all and that is your first digit.
For the second digit, head back downstairs and look through the keyhole of the eastern door, count the Funny Faces. This is a bit tricky, as some of these shows up only when you wait in the corner with your camera. Make sure to wait when you hit the both corners for a few seconds.
For the third digit, go upstairs and look through the western door, count the dumbapples (purple apples) and dumbapple cans. Both needs to be counted.
For the fourth and the last digit, head back downstairs and look through the western door, count the chairs. This is the easiest digit of them all.
Lastly, head upstairs into the room in the northwest and open the safe. Report back to the boy and get hints for the next wonder.
Seven Wonders #5
Head into Shinra Manor, Underground Cave. It can be entered from the top floor side room after some scenes. Defeat a Sahagin enemy to get a Coffin Key. As soon as you get of the elevator, you can run around this area before heading down the ladders until the enemy attacks you. Now, head down the ladder and enter the southeastern room. Use a key to open the right coffin. The rest of the coffins have enemies inside. Report back to the boy to get clue about the next wonder.
Seven Wonders #6 & ATK Up++
After story events in the Facility that is inside the Shinra Manor Underground Cave, Nibelheim will be on fire. Talk to the boy when you regain control and accept to save his mother. You have 1 minute, but it's so easy you'll be done i 15 seconds. Tilt your analogue stick Up, Right, Up, Right, Up (after this you will start ascending the stairs), Left, Up, Left, Down, Right, Down. Inspect with X, and return outside following the directions from the last to the first one.
Chapter 9
1:20 - Mail #69: Wonder Hunter – The Last Wonder
1:30 - Seven Wonders #7 & Wall materia & Seven Wonders Expert trophy
Seven Wonders #7 & Wall materia & Seven Wonders Expert trophy
Head to the northeast corner of Nibelheim Outskirts area (just go north all the way from where you exit the Shinra manor) and pick up the Wall Materia behind the fence. This is the last wonder, which unlock the corresponding trophy.
This can be unlocked in Chapter 10 (Finale) before you face the final boss.
0:00 - Cage Opener trophy start & "LOVELESS – Prologue" Tablet #1
0:17 - Act II Tablet #2
0:50 - Act III Tablet #3
1:30 - Act I Tablet #4
1:50 - Defeating 5 enemies to unlock Cage of Binding area & Cage Opener trophy
Cage Opener trophy
When you enter the Depths of Judgement, save athe bottom. This is like a middle hub area. Inspect the tablet ("LOVELESS – Prologue") here next to the save, and make your way towards and into the northwestern area (Howling Fang). Inspect the tablet here for Act II. Return back to the hub and enter the area south (Portal of Severance) for Act III, and finally, back to hub and east side cave for Act I tablet. After reading all four tablets, enter Lake of Oblivion (next to the Act I, east) and in the area will be 5 glowing mako springs you can interact with to spawn an enemy. Defeat all 5 of these enemies (Quake and Thungaga works good), and a path will open to the Cage of Binding, to the north of the lake. This unlocks the trophy.
This trophy can be unlocked during Chapter 2, when you end up in the mission in Banora village.
Banora Treasures trophy - Part 1 Before you enter the facility, this trophy comes first, then in between you will do a missiles mini-game.
Slicin’ SOLDIER trophy - After leaving the factory there will be a minigame where you have to slice the incoming rockets. You will have to slice all 10 without missing. Just watch out for the blue reticles to show on-screen, which appears when the rocket is close to you. The last one is a bit weird, it changes the camera, but it's still the same approach. If you don't make it, just re-load the last auto-save and retry until you do.
50:40 - Banora Treasures trophy - Part 1 (First 3 items - Inspect them before you enter the facility, you must if you want the trophy)
51:58 - Slicin’ SOLDIER trophy (Press the attack button when blue target appears - just when the rocket is about to hit you. Do it 10 times)
52:52 - Banora Treasures trophy - Part 2 (Collect all 5 items that you've inspected before, before you enter the house)
This trophy can be unlocked in Chapter 4.
When you reach the market area with Aerith, your wallet will be stolen. After getting your wallet back, interact with the "Shopping Paradise" store to start this minigame. This can be weird, but let me explain. If you see "Dip" on the screen, it means 1 point. DipDip means 2, Splash 10. You start with a number such as "21" (random every time) - You need to count the dips on the screen until they reach that number. That means when you see "Dip DipDip Dip" - it's 4 points. When you observe the final number (21 in my example), press X. Sometimes it won't accept, I had to restart in between every round. Repeat making the perfect potion for 3 times to raise +15 affection.
1:40 - Good Match for Aerith trophy start (Raise affection with Aerith to the max - inspect stores, do mini-games etc.)
2:20 - Good Match for Aerith - Store #1 (+10 points)
3:38 - Good Match for Aerith - Store #2 (+10 points)
5:05 - Good Match for Aerith - Store #3 (+10 points)
6:22 - Good Match for Aerith - Wait 10 times for a girl (+10 points)
8:23 - Good Match for Aerith - Give 5 points to a boy (+10 points)
11:05 - Good Match for Aerith - Answer with buying the medicine (+10 points)
12:20 - Master Blender trophy (+15 affection points) - Repeat 3 times
14:47 - Godlike trophy
15:50 - Bingo! trophy
17:30 - Good Match for Aerith unlock
This trophy can be unlocked in Chapter 4.
When you reach the market area with Aerith, your wallet will be stolen. After getting your wallet back, talk to the boy in the corner in the market for a number-guessing minigame. Save, accept, ask Aerith for tips, remember them (she says 2 and 4 for example), ask the kid for the tips, remember them (he says something like 2, 5, 6). The number that they share (2 in my example) is the correct prediction. Sometimes it's not, so just re-load the save and try again.
1:40 - Good Match for Aerith trophy start (Raise affection with Aerith to the max - inspect stores, do mini-games etc.)
2:20 - Good Match for Aerith - Store #1 (+10 points)
3:38 - Good Match for Aerith - Store #2 (+10 points)
5:05 - Good Match for Aerith - Store #3 (+10 points)
6:22 - Good Match for Aerith - Wait 10 times for a girl (+10 points)
8:23 - Good Match for Aerith - Give 5 points to a boy (+10 points)
11:05 - Good Match for Aerith - Answer with buying the medicine (+10 points)
12:20 - Master Blender trophy (+15 affection points) - Repeat 3 times
14:47 - Godlike trophy
15:50 - Bingo! trophy
17:30 - Good Match for Aerith unlock
This trophy can be unlocked in Chapter 4.
When you reach the market area with Aerith, your wallet will be stolen. After getting your wallet back, interact with the "Item World" store to start this minigame. You will have to run and keep pressing X to collect materia from the floor. You need to collect 20 under 14 seconds and then talk to the NPC again. It's not that hard, but the camera can really distract. He will comment about your Godlike speed if you've succeeded.
1:40 - Good Match for Aerith trophy start (Raise affection with Aerith to the max - inspect stores, do mini-games etc.)
2:20 - Good Match for Aerith - Store #1 (+10 points)
3:38 - Good Match for Aerith - Store #2 (+10 points)
5:05 - Good Match for Aerith - Store #3 (+10 points)
6:22 - Good Match for Aerith - Wait 10 times for a girl (+10 points)
8:23 - Good Match for Aerith - Give 5 points to a boy (+10 points)
11:05 - Good Match for Aerith - Answer with buying the medicine (+10 points)
12:20 - Master Blender trophy (+15 affection points) - Repeat 3 times
14:47 - Godlike trophy
15:50 - Bingo! trophy
17:30 - Good Match for Aerith unlock
![]()
At the start of the Chapter 5 enter the Training Room and talk to the man inside to start the Squatting Minigame. You will have to beat four opponents. The rules of the game are that you have to press the triangle button at the correct time (when you're almost at the bottom, squatting). Every 5 successfull squats raises the speed, meaning that you'll have to press the triangle button sooner and sooner. It will speed up 3 times and then it will follow that speed until you miss, which brings you back to the first speed sequence. On the last speed sequence you must press triangle as you start ducking. It's not really that hard.
0:00 - Shinra’s Squats Champion trophy (Flower Wagon Parts: Shinra Lunch Cart Specs, Shinra Ceramic, Shinra Treads, Shinra Solder)
This can be unlocked in Chapter 5, when you reach Modeo Ravine and meet Cloud.
Soon after meeting Cloud you will have to descend a bit and there will be a facility in front of you. Save your game first. When you enter the facility, the scene will trigger and you will have to avoid the patrolling guards. Simply crouch in the blue zones with L1 to hide, and run past when they’re not looking. The exit is on the right from where you enter, then behind the wall there. It's relatively easy to even pick up all of the chests (they dissapear later), but if you want to play it safe, just duck on the first crouching point in front of you, wait until soldiers go away, and just move towards the exit. If you stand next to the wall on the right from where you enter, the soldier patroling cannot see you.
35:40 - Master Infiltrator trophy
This trophy can be unlocked in Chapter 6.
A bit later in the chapter, when Hollander escapes during the assault on Junon, a minigame will start where you must stop enemies from reaching the purple outline at the end of a road behind you. You will need to approach an enemy, defeat it, and repeat until you do the same for all 30 enemies. It's really easy. The best way is to say a bit in front of the outline behind you, and just run towards enemies when you see them, and then go back and repeat.
0:52 - Immovable Object trophy
This can be unlocked during Chapter 9.
After leaving Nibelheim, you will have to go down a hill and shoot some robots with sniper rifles. You have to kill all robots at sniping spots without any of them escaping. It's really easy, but here are some tips: Shoot them in the head for instant kill. You can farm robots at the top and spend points you get for killing them into a riffle (max out the strenght, then buy a bomb, and then raise other attributes). You spend points by choosing that option when you inspect the riffle on the floor. If some robot escapes, you will have to redo the whole part.
- Robot point #1 - 1 stationary robot. Shoot it in the head.
- Robot point #2 - 1 stationary robot. Shoot it in the head.
- Robot point #3 - 2 moving robots. Shoot one in the head and try to be fast and do the same with the other one.
- Grinding robot kills - Move in between the start of the area and before the next point and collect aroun 50 robot kills. Enhance your power and buy bombs.
- Robot point #4 - 3 moving robots in the distance, kill the one on the right first, then the left one, and then the middle one.
- Robot point #5 - Go right when you see a split on the road. This point has 3 stationary robots that you can instantly kill by shooting the barrel.
- Robot point #6 - Go down the road. There will be 2 boss robots on the left: BIGGS and WEDGE (9999 HP each). It takes 3 headshots to kill one. Kill one with a bomb, then be fast when killing the other one.
- Robot point #7 - Next point is at the next split on the left. They start escaping as soon as you approach the sniper point, so be fast.
- Robot point #8 - The final one is when you're trying to exit. Shoot the barrel near the left robot, then take care of the other 2. It should be easy at this point, with upgraded sniper it takes few shoots in the shield.
- Continue to the end of the section and the trophy will unlock after that.
3:25 - Zack the Sniper trophy
3:45 - Robot point #1
4:05 - Robot point #2
4:30 - Robot point #3
5:00 - Farming Robot points and upgrading your riffle
7:40 - Robot point #4
8:40 - Robot point #5
9:25 - Robot point #6 (Biggs and Wedge)
10:35 - Robot point #7
11:35 - Robot point #8
This can be unlocked in Chapter 9 when you reach Gongaga, around the end of the chapter.
When you climb the hill and meet Genesis at the top, there will be some scenes. After them you need to head back down. While in this area, defeat 7 encounters, and only then leave the area. You will be prompted to stay a bit and collect some chests from the waterfall. It's easy, but it's done if an enemy hits you. Stay in the middle, then collect left and right chests. Again, middle, left, right. And again and again. When you gather 10, you get Goblin Punch materia (which can become a Costly Punch materia with fusion - on of the best materia in the game).
17:03 - Waterfall Chaser trophy
19:25 - Waterfall Mini-game After the scene with Cissnei in Gongaga – Outskirts, open a in a chest to the south at the corner of the area. There are couple of chests, but only 1 has this item.
This trophy can be unlocked in Chapter 4.
When you reach the market area with Aerith, your wallet will be stolen. After that you must reach high affection with Aerith. Aerith affection will go up by +10 for interacting with each of the three shops when you're looking for Bruno. That is the first part of the wallet retrival.
Afterwards, you can talk to the girl market yellow on the map and you need to choose "Wait" options 10 times, to get another +10 affection. You can also talk to the boy market yellow on the map, and give him potion 5 times in a row. That will be another +10 affection.
After you search for the boy, you will be give 2 options. If you choose the second one, to buy with your own money, that will raise Aerith affection +10. The first option gives +5, so ignore that one. You should now be at +60 affection points.
After you get your wallet back, save your game. You must conduct 3 perfect potions at the "Shopping Paradise" shop in the market (Master Blender trophy). This can be weird, but let me explain. If you see "Dip" on the screen, it means 1 point. DipDip means 2, Splash 10. You start with a number such as "21" (random every time) - You need to count the dips on the screen until they reach that number. That means when you see "Dip DipDip Dip" - it's 4 points. When you observe the final number (21 in my example), press X. Sometimes it won't accept, I had to restart in between every round. Repeat making the perfect potion for 3 times to raise +15 affection.
I would suggest that you do the Godlike trophy while you're here, and Bingo!. Save before each. Godlike trophy can be unlocked at "Item World" shop by talking to yellow-marked NPC there - you will have to run and keep pressing X to collect materia from the floor. You need to collect 20 under 14 seconds and then talk to the NPC again. It's not that hard, but the camera can really distract. Bingo can be unlocked by talking to the kid marked on the map in the market. It's a game of guessing. Save, accept, ask Aerith for tips, remember them (she says 2 and 4 for example), ask the kid for the tips, remember them (he says something like 2, 5, 6). The number that they share (2 in my example) is the correct prediction. Sometimes it's not, so just re-load the save and try again.
If you continue with the chapter until you reach the end of Sector 5, you can unlock the Good Match for Aerith trophy. You will run into Bruno, and if you get the dialogue "You and Aerith make a Good Couple", the trophy is yours. You need to collect +75 affection to unlock it. If he says you are an "okay couple" you missed something like blending a bad perfume. Make sure to have a save before everything and during this trophy.
1:40 - Good Match for Aerith trophy start (Raise affection with Aerith to the max - inspect stores, do mini-games etc.)
2:20 - Good Match for Aerith - Store #1 (+10 points)
3:38 - Good Match for Aerith - Store #2 (+10 points)
5:05 - Good Match for Aerith - Store #3 (+10 points)
6:22 - Good Match for Aerith - Wait 10 times for a girl (+10 points)
8:23 - Good Match for Aerith - Give 5 points to a boy (+10 points)
11:05 - Good Match for Aerith - Answer with buying the medicine (+10 points)
12:20 - Master Blender trophy (+15 affection points) - Repeat 3 times
14:47 - Godlike trophy
15:50 - Bingo! trophy
17:30 - Good Match for Aerith unlock
Minerva is the most difficult boss you can face in this game. You can fight Minerva in Mission 9-6-6, and I encourage you to leave this for the end. First, you need a good preparation, so let me explain what I've used for this fight.
It's really important to reach around 240 SPR at least, and also VIT around that mark. Having 255 (which is max) is also recommended, but I was missing SP points and items to raise it futher. Prepare Mug to steal x99 Phoenix Downs from Minerva (1 successfull steal gives you as much as you need to have 99 Phoenix Downs). You can also go with Curaga or Full Cure, but I had a lot of Elixirs at this point. Even without Elixirs you can just spam Phoenix Downs and make it like that.
The most important is that you break your HP, and Damage limits - for which I've used Genji set, and instead of the Helm just equip Ziedrich (that accessory gives +100 to all Status attributes except LCK).
In the fight you want to use Phoenix Down as you start, and then steal them. When you do, you will have x99 Phoenix Downs. When you die, use one. Keep repeating throughout the whole fight. If you have hight VIT and SPR, Minerva wouldn't be able to 1-shot you. If Minerva uses Judgment Arrow, be careful and use Phoenix Down afterwards, that attack nulls the buffs including revive!
It takes some time, but it's really easy with Phoenix Downs.
Video coming soon...
You can play the whole game on Normal, make a save before the final boss in Chapter 10, defeat the boss, load that save, grind a bit, switch to Hard difficulty and defeat the final boss again. It's not that hard, especially when you create Costly Punch materia, break damage limit, and collect Adaman Bangle that breaks the HP limit. More details about how to level up and prepare can be found in the next topic:
Crisis Core Final Fantasy VII Reunion - Chapter 10 Collectibles
Game Review
Latest Trophy Guides
Latest Reviews
Leave a comment
Please Log in to leave a commentComments
No comments available!